Sunday, April 26, 2020

Azure Machine Learning Service

Azure ML service is an end-to-end machine learning service available on Azure which can help  data scientist to automate the machine learning life-cycle. The model can be built in the local then deploy, train and validate it on the cloud. Azure ML Service currently supports Python SDK, .NET SDK and Java SDK. In this article, I use the Python for the development.

We explore how to train a machine learning model using the Azure ML service. Then, we talk about the purpose and role of experiments, runs, and models. Finally, We exercise how to train ML models with Azure resource available that includes creates a workspace, builds a compute target, and executes a training run using the Azure ML service.

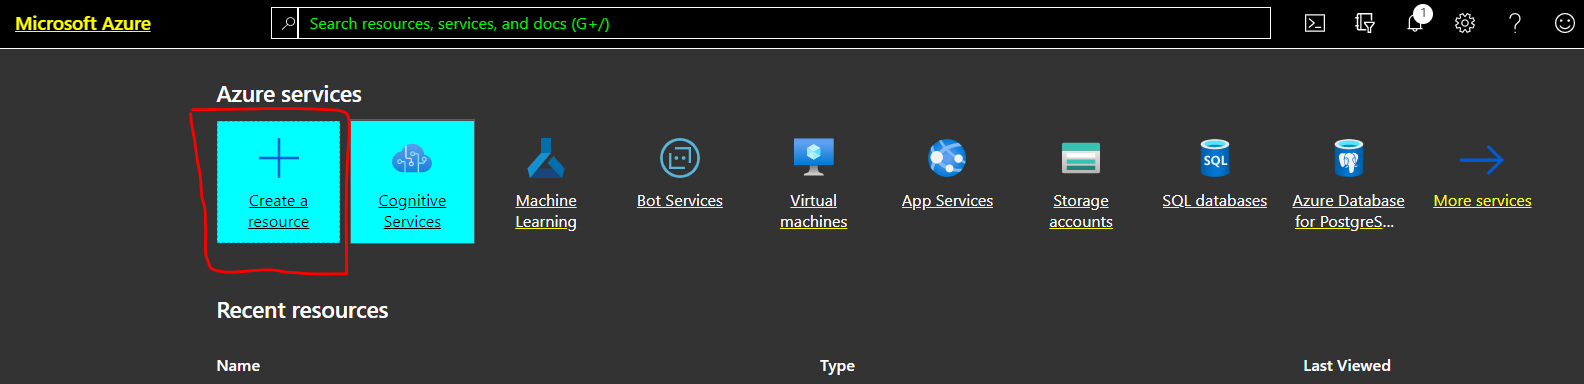
1) Create a workspace


Workspace is where all references of ML resources are centralized. It keeps the historical logs of training, run versions. It allows us to define different Compute Targets to run your experiments where we pipeline the process of building ML model.

MS Azure offers us several ways to create a workspace. We can use either Azure Portal or Azure CLI or REST Service or Resource Template. I highly recommend to use Azure Portal because it is easy just with some clicks.

The first condition is to have a valid account and a valid subscription. Check out this article to see how to get one.

Check out this part to get step by step of workspace creation

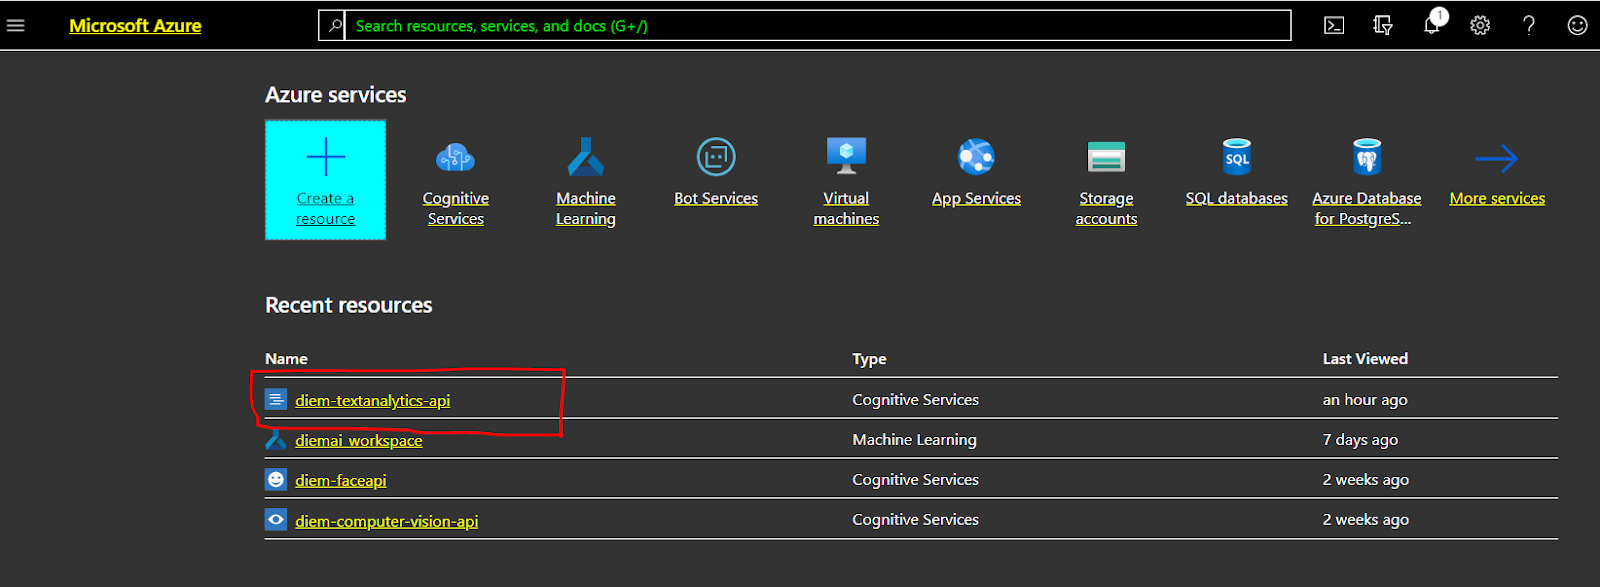
Once we sucessfully created a workspace for Machine Learning, we should see it on our home page.
My workspace name is diemai_workspace:


Click on the workspace name to get the details.


My workspace's resource group is cognitiveai which is a subscription name and it is free in 30 days.

2)  Create and train Machine Learning model with Azure ML Service


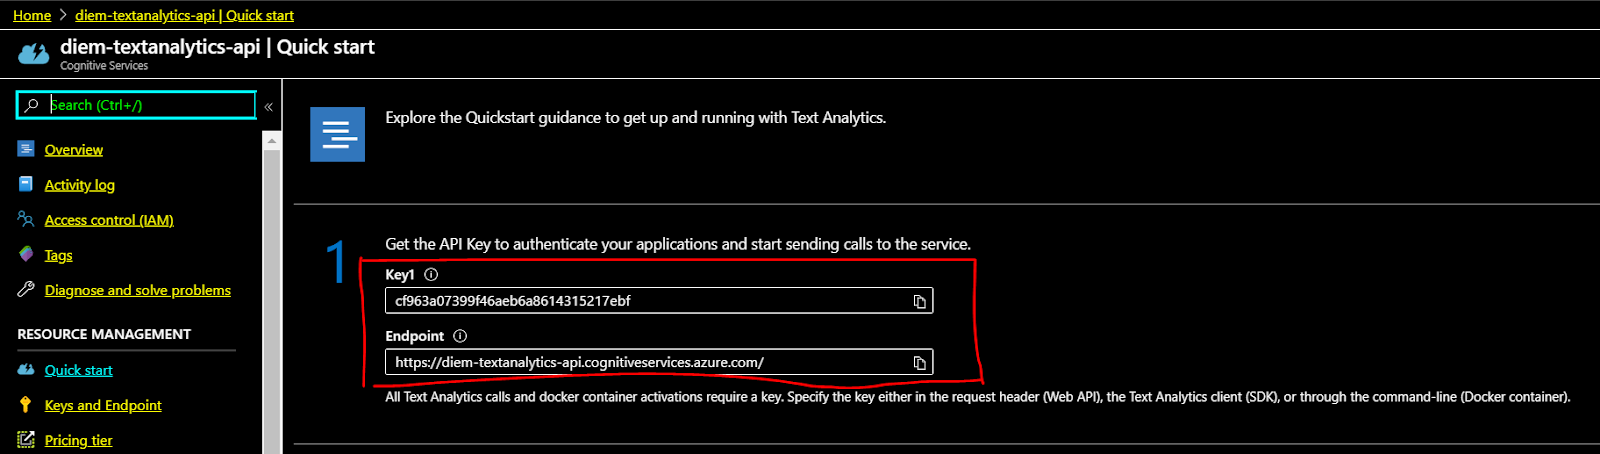
First, we have to create an instance of workspace with Python by using azureml.core.Workspace object and filling the parameters with workspace name, subscription ID and group name as the following:


3) Setup the computing resources

We need to specify a compute configuration that specifies virtual computer target and virtual machine type and size used in the computation. I set the computer target is amlcompute and its type is Standard_F2s_v2. I also indicate the version of python packages that are used in the run.


The reason I set Standard_F2s_v2 for vm_size because it is valid resources provided by Azure when we created a subscription. vm_size is changed when we change the region of subscription. To know which resources are available for use, run the following command:

AmlCompute.supported_vmsizes(workspace = diemai_ws)

4) Create a python script with selected dataset and ML Algorithm


After running the above code, we got a python file lg_house_boston.py in the local directory. We continue to execute that file and finally, we got trainset and testset variables as well as an instance of Linear Regression saved in lg_house_boston.pkl file.

5) Run Script

Now, we create a Run Script where we specify the python script and computing resource:


6) Experiment and Task Submit

Last step is to setup an experiment and submit it to Azure Cloud


When the training is completed, all log files are saved in azureml-logs directory


We can also view the process of run with Jupiter Widget


7) Download model to the local


We can download running model on Cloud to local and validate it with testset and compute mean square error


Tuesday, April 21, 2020

Sentiment Analysis with Azure Text Analytics API

Azure Natural Language API is one of Microsoft Cognitive Services API which provides a wide range functionalities from text analytics, Q&A, to text translation and chatbot. This article introduces the sentiment analysis capabilities of text analytics API. In order to call API services from Azure Portal, it requires a valid subscription, an endpoint request, request parameters, JSON-structured data and finally explore JSON responses of API.

1) Subscription


In order to create a resources on Portal Azure, the very first step is to have a Microsoft account and a valid subscription. Microsoft offers you an free Azure account with 200 credits to explore Azure Services in 30 days. Check out the Part 1 to see creation steps.

2) Endpoint Request


Endpoint is where we send the request and process it. It consists of URI and non-expired subscription key and . When we succeed in creating an account and a subscription on Portal Azure, we continue adding a new resource for text analytics:

Click on "Create a resource"


Select "AI + Machine Learning" and "Text Analytics"


Fill the required input and click on "Create new". The input required in Resource group is subscription name in step 1.


If not any errors happen, the new resource is added in Home page as the following :


Click on the resource name, it is where we obtain the subscription key and endpoint request


Mission accomplished !!!

3) Request parameters for Sentiment Analysis


Request has 3 main parts: Header, URL and JSON documented-data

Header is dictionary object whose the key is "Ocp-Apim-Subscription-Key" and the value is API key  in the previous step.

A complete URL comprises 2 parts: Endpoint in the above image plus the API URI which is indicated particularly to our purpose. At this moment, we use Azure API to detect the sentiment  hidden in the text

JSON document is an array of JSON object consisting of key, language and text.


4) JSON response from Sentiment Analysis Request


First, the sent request has no errors so that  we can continue analyzing the response data. Clearly that score of text 3, text 5 and text 6 got very small which means they are negative because some words like "shiver", "crie", "die" appear in the text. The expected results are not bad at all !!!


5) JSON response from Entities Extraction Request


The only thing we should do is to modify the API request and JSON document in request body and send them to the Azure


The output is very comprehensive and informative. It found 2 entities in text: Statue of Liberty and New York city. The confidence score for the prediction is about greater than 0.8. Also It provides the location of the entities.

6) JSON response from Language Identification request


Language detection is one of sub fields of Natural Language Processing  which recognizes the natural languages used in the text. Similar to precedent part, URL and JSON document are changed to be compatible with purpose use.


As we can see, 3 different languages are detected in the texts are English, Vietnamese and French with confidence score is 1.0


Thursday, April 9, 2020

Microsoft Azure Vision API - Face Detection

This post is a continuation of part 1 :  Microsoft Azure Vision API - Computer Vision

Lets play around with Face API which is a part of Microsoft Azure Vision. Similar to computer vision, we must have a Microsoft account, a valid subscription and face resource which is key and endpoint in order to access Face API services. Check out the Part 1 to see creation steps.

The purpose of Face API is to extract some parts of face, the expression to predict the age, the emotion of the image.


First, we select a face image. It can be in local or an URL


Next, we copy the secret key subscription and end point URL from Microsoft Azure Resource that we created in Part 1


Then, We build a REST API request object which consists of headers, parameters and data. They are formed as dictionary object.


What we know about image is put in 'returnFaceAttributes' attribute in parameters object. In the example, I want to know the age, gender, head pose, facial hair of the object. I also want to check if that person was wearing glasses or not or whether he/she was wearing makeup.

We just finish the request part. Lets try to send it  and hope no errors happen.


Return code is 200 means request is completely processed. Lets explore return attributes in the response


Json object is well-printed with pprint. With data extracted in the image, it is a man whose age is 37. His emotion is predicted as neutral with 99% confidence. He doesn't wear glasses neither. Wanna guess who is he?


It is Emmanuel Macron, French President. Well, in the picture he looks 5 years younger than he is.


Microsoft Azure Vision API - Computer Vision

Vision API is one of Cognitive Services APIs provided by Microsoft Azure in order to help AI developers to build their own dedicated Machine Learning model or whether they are going to use a pre-canned or pre-trained version. Developer can add Machine Learning features into their applications without much direct AI or data science knowledge.

Vision API includes computer vision, face recognition, content moderator, a video indexer and customer vision. In this post, We are trying to explore how to use Azure APIs to extract hidden data in the images with computer vision API and face recognition API.

Prerequisites

Create a Microsoft account - Create one here

Create a valid subscription key for computer vision and face detection. Create one for free. The free trial is available in 30 days before the update.

Create Azure Cognitive Services Resource - Create one here. The resource give us key and endpoint URL that allow us to call APIs

Now , go to  Azure portal, login with your  Microsoft account, list created resources, you are able to something similar to the below screen:


We are going to call those APIs with Python and Jupiter Notebook

Call Computer Vision Service

- Prepare an image: It can be located in your computer or in internet. I choose an Eiffel tower in Paris where I pass by every morning.


- Get the API Key and endpoint that you already created in previous step to authenticate your applications and start sending calls to the service.


- Once we got the endpoint, we build complete URI request to access computer vision service:


- Setup the request header with subscription key and URL request, parameters and data object. They are structured as dictionary.


- Lets send the request to server with the help of request - a Python package


- Notice that we got model response as data type and response code of 200. It means request is successfully sent and we receive data in the response.
- We're going to sign analysis to response.json. And now, we're going to print the type of analysis which is going to be a dictionary this returned and we're going to print the analysis itself as well


- The returned data consists of categories, tags, descriptions, captions and metadata of image. The picture is categorized a building with confident score 36%. In the description, some information is extracted such as outdoor, city, grass, sheep, view, standing, white, river, group, large, water, building,..With those information, a caption is generated as 'a large body of water with a city in the background' with confidence of 90%. Sound funny!!

- Lets use the metadata to plot the picture. We're going see what is large body in a city


View Python code and Jupiter Notebook on Github